Not sure how to track conversions in WooCommerce? Conversion tracking helps you better understand what sales channels are working and what needs improvement.
Plus, you can use it to gather insights, such as your best-performing products, reasons why customers are abandoning carts, and devices that channel the most traffic to your store, among many others.
To assist you, in this article, I’ll cover what Woocommerce conversion tracking is, the step-by-step methods for tracking conversions from different social media and ad networks, and several key metrics to watch if you want to run a successful WooCommerce store. Let’s begin.
What is WooCommerce conversion tracking and why is it important?
In ecommerce, conversion refers to any action a visitor takes that advances your business’s revenue or profitability. Therefore, Woocommerce conversion tracking refers to the practice of monitoring and measuring the number of successful actions visitors take on your websites and social media campaigns.
Why should we track conversions in WooCommerce? you may ask. Well, for one, monitoring customer actions will help you better understand their shopping behaviors.
This involves learning which products are popular, how users are finding your website, how many users end up making a purchase, and more. Once you’ve set up your store, you need to learn what works to grow your business, and conversion tracking in WooCommerce helps you do exactly that.
Furthermore, tracking your WooCommerce conversions will help you access several key performance indicators and statistics such as your average order value, cart abandonment rate, your top referral sources, and more.
To get started, you will need to install the WooCommerce conversion tracking plugin. Here’s how to do so:
How to Track Conversions in WooCommerce
Install the Conversion Tracking Pro for Woocommerce:
- Go to your WordPress admin panel. Navigate to Plugins and click on Add New.
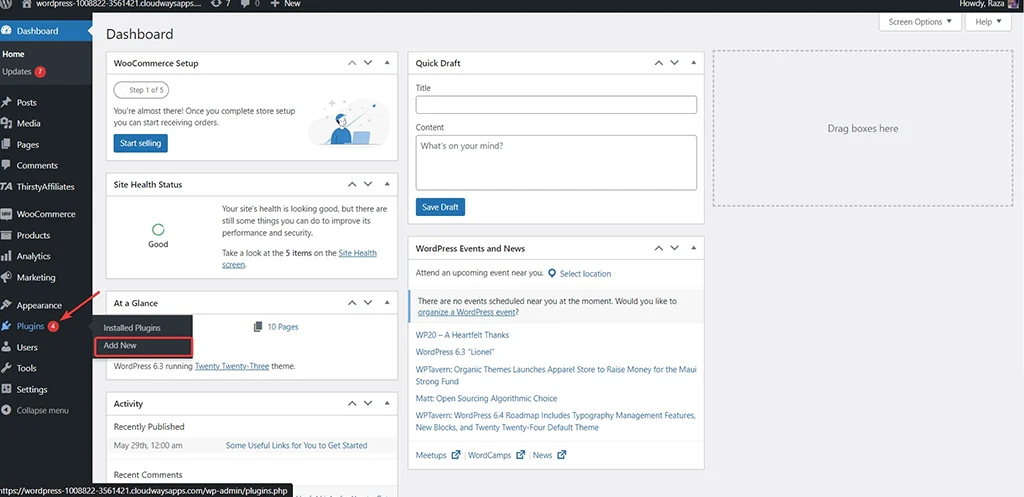
- Search for WooCommerce conversion tracking, then click Install now.
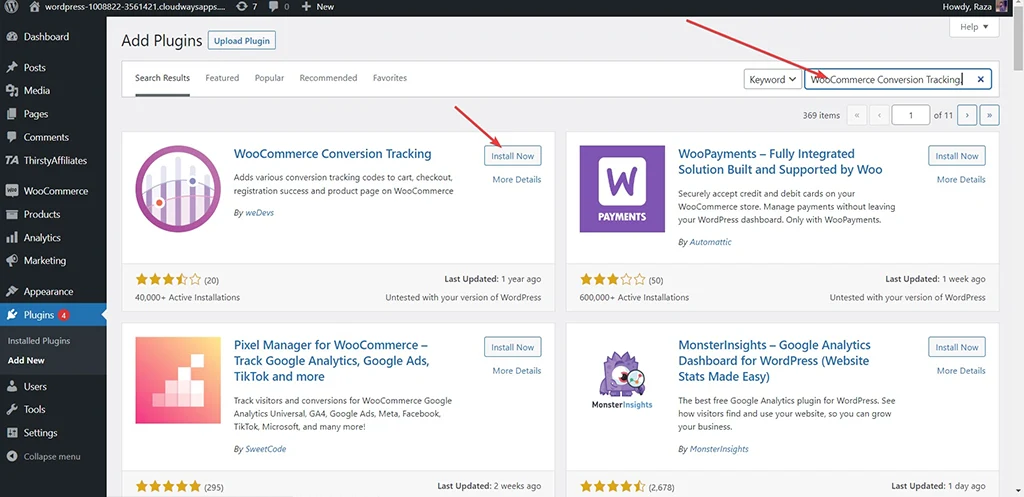
- Once it’s successfully installed, click Activate.
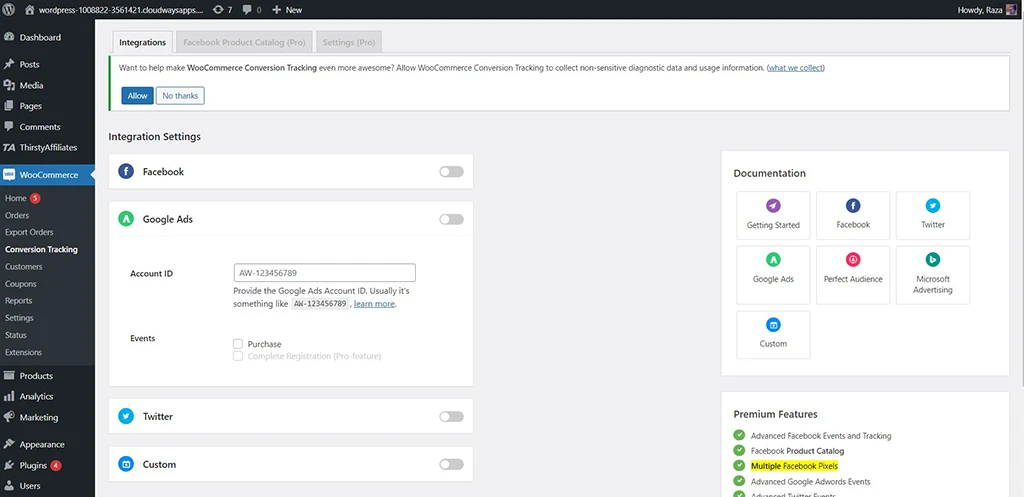
With these steps, the free plugin is ready for use. As shown in the image below, you can now see and interact with the extension under the WooCommerce option on your admin panel. Alternatively, you can view it through your plugins directory.
Configure the plugin:
Starting off, here’s what the interface looks like:
Neat and simple, right? On the left side of the screen, you’ll see all the platforms where you can use the WooCommerce conversion tracking plugin. On the right, you’ll see documentation settings for different platforms.
And at the bottom right-hand side, you’ll see the premium features that are only available to premium users. With this in mind, let’s cover how to configure the plugin with several platforms.
For Facebook:
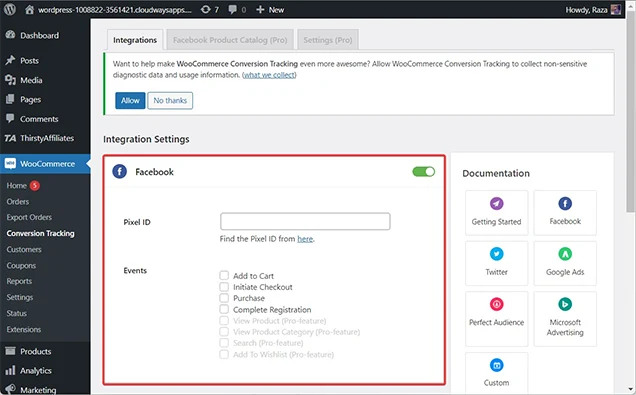
- Navigate to WP Admin Dashboard → WooCommerce → Conversion Tracking → Integrations → Facebook.
- Click the Facebook toggle button. After that, you’ll be asked to enter your pixel ID. To find it quickly, simply press the find pixel ID prompt.
![]()
- You’ll then be redirected to Facebook Events Manager where you’ll find the data and statistics of all your paid ad campaigns.
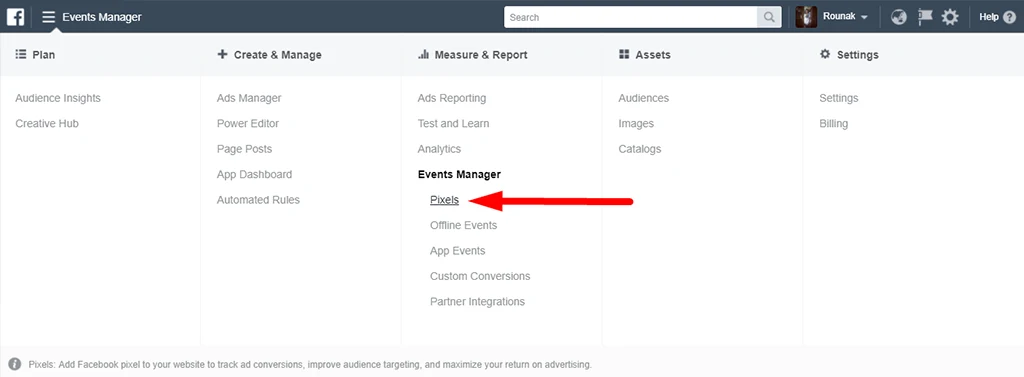
- To locate your pixel ID, click the dropdown on the top left of the screen and find Pixels under Events Manager.
![]()
- Copy the pixel ID you find and paste it into the WooCommerce tracking plugin. Afterward, click Save Changes, and you’re good to go with setting up your WooCommerce integration.
![]()
Facebook Events
When an action occurs on your site, Facebook logs it as an “Event”. With Woocommerce conversion tracking, you can monitor 8 of these events on your Facebook.
- Add To Cart
- Initiate Checkout
- Purchase
- Complete Registration
- View Product
- View Product Category
- Search Product
- Add To Wishlist
For Twitter:
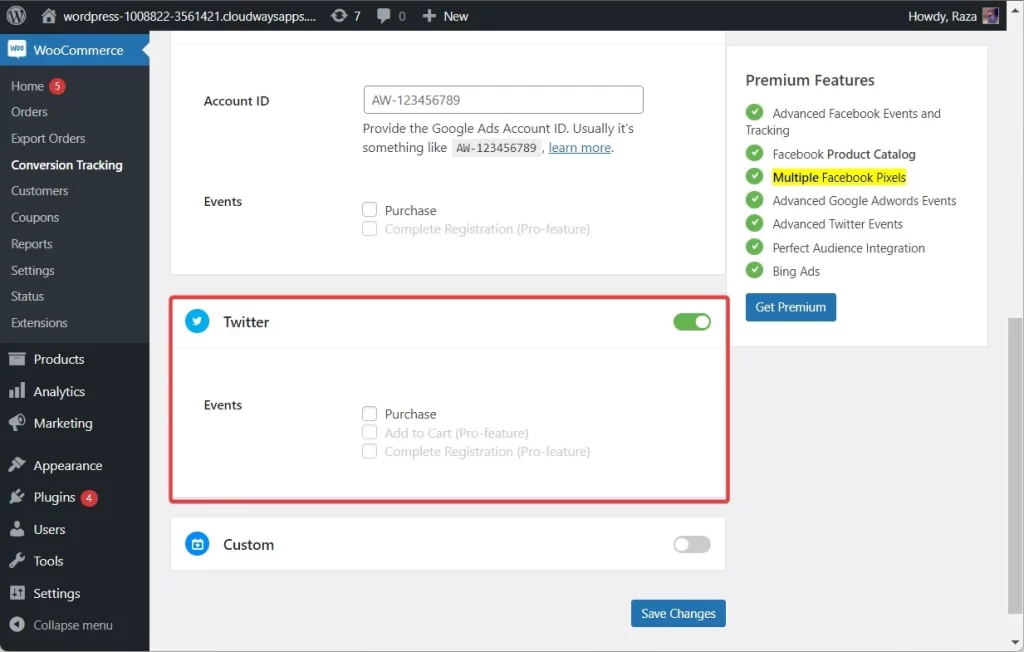
With the help of the WooCommerce Conversion Tracking plugin, you can track three events on Twitter: Add To Cart, Purchase, and Complete Registration. Configuring these three events for Twitter involves nearly identical processes, so watch closely to discover how you can set them up yourself:
- First of all, activate the Twitter channel.
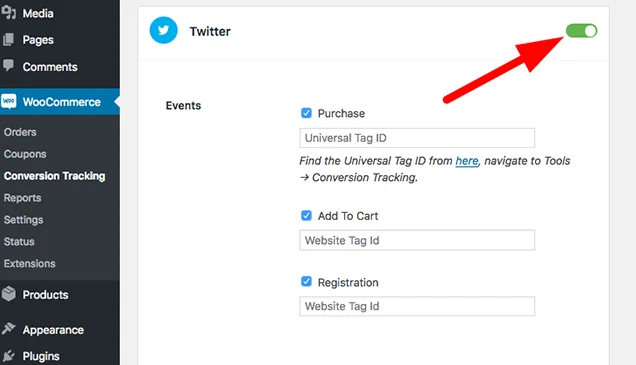
- As shown in the image, navigate to WP Admin Dashboard → WooCommerce → Conversion Tracking → Integrations → Twitter. After that, click the toggle button to activate Twitter.
Twitter Events
Add to Cart Event
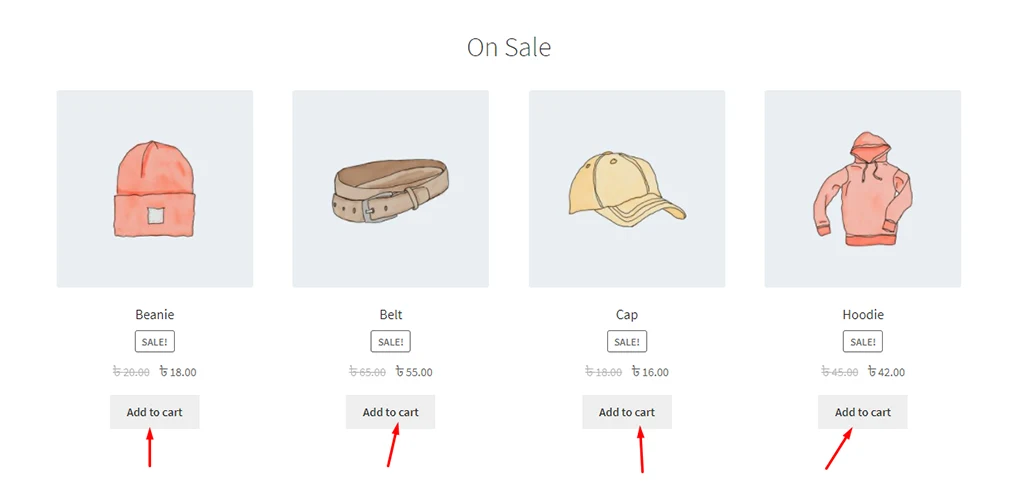
When a visitor includes an item to their cart, the WooCommerce Conversion Tracking plugin can track and record this event’s details. Here are four examples of the “Add to Cart” event:
Here’s how to monitor the “Add to Cart” event using WooCommerce Conversion Tracking:
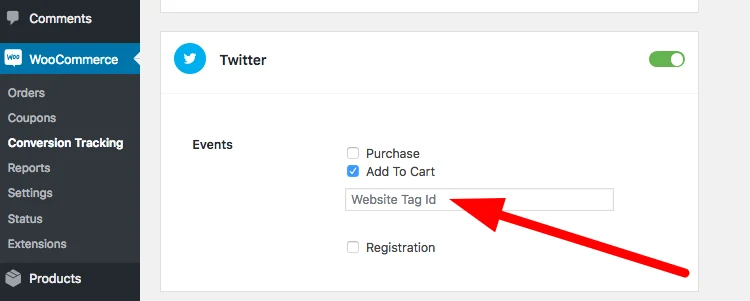
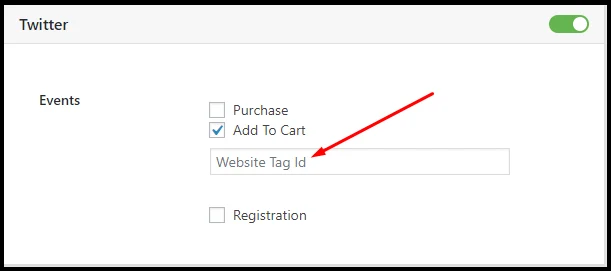
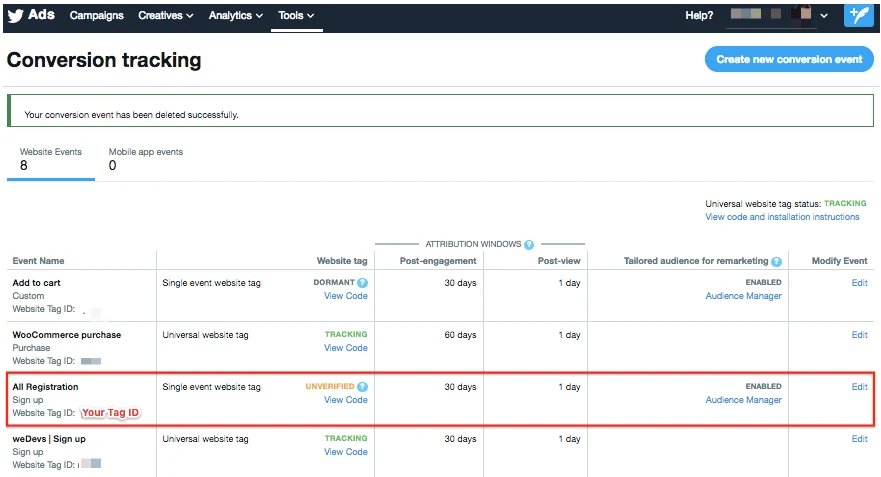
Step 1: Navigate to the WordPress Admin Dashboard → WooCommerce → Conversion Tracking. Next, check the “Add to Cart” box for Twitter. You will be required to enter the Website Tag ID, which can be found in your Twitter Ads Account.
Step 2: To find a single-event Website Tag ID, visit your Twitter Account’s Ads dashboard → Tools → sConversion Tracking → Create New Conversion Event. After creating a New Conversion Event, select a Conversion Type.
Choose the type “Custom” from the list and ensure that you have checked the “Use a single-event website tag” radio box. Also, check the “Create a tailored audience” box.
Step 3: Hit the “Save conversion event” button, and you will get a Custom Website Tag ID.
Step 4: Lastly, copy the Custom Website Tag ID then paste it into the Twitter Events page.
Purchase Events:
Navigate to the WordPress Admin Dashboard → WooCommerce → Conversion Tracking.
Next, check the “Purchase” box for Twitter. Once you’ve clicked it, you’ll have to insert your Universal Tag ID.
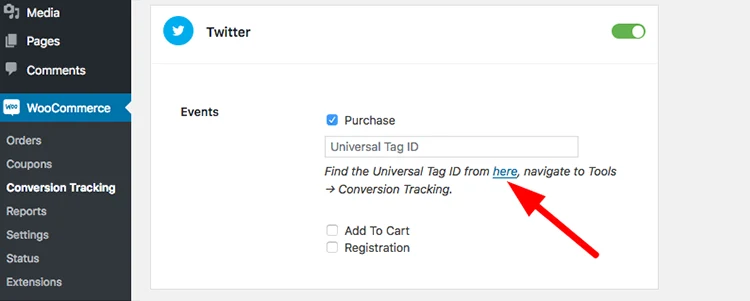
To find and use your Universal Tag ID, head to your Twitter Account’s Ads dashboard → Tools → Conversion Tracking → Create New Conversion Event.
After creating the new conversion event, choose a Conversion Type. In this case, select “Purchase.” Click “Save Conversion Event,” and shortly after, you’ll receive a Universal Website Tag ID.
Finally, take the Universal Website Tag ID and paste it into WooCommerce Conversion Tracking. After that, click on “Save Changes.”
Complete Registration event:
This event is triggered when any visitor completes the sign-up process on your WooCommerce website.
Here’s how to track the “Complete Registration” event on Twitter:
Step 1: Go to the WP Admin Dashboard → WooCommerce → Conversion Tracking. Next, check the “Registration” box on Twitter. After ticking the Registration box, you will see a field to insert the Website Tag ID.
Step 2: Enter to your Twitter Account’s Ads dashboard then navigate to Tools → Conversion Tracking → Create New Conversion Event. After creating a new conversion event, select a conversion type. Choose “Sign up” from the list of conversion types. Check the “Use a single-event website tag” radio box, and then check the “Create a tailored audience” box.
Step 3: Hit the “Save conversion event” button to get a website tag ID.
Step 4: Copy this Website Tag ID and paste it into WooCommerce Conversion Tracking. Finally, click on the “Save Changes” button, and you are done.
Note: To track these events, you need a paid Twitter Ads account.
For Google Ads:
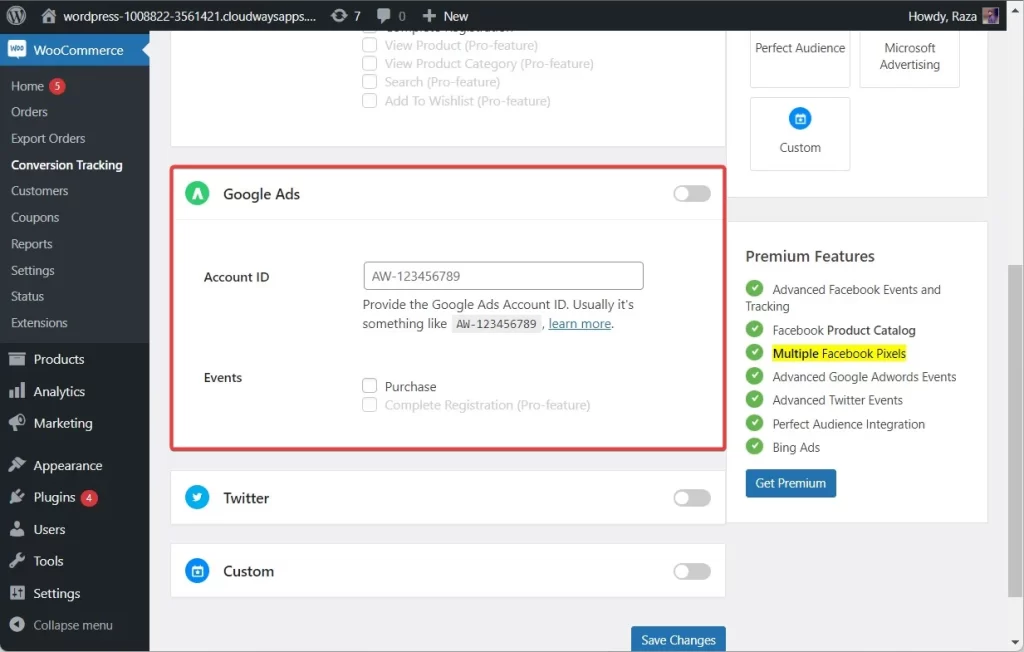
Using the WooCommerce conversion tracking plugin, you can send data directly to Google Ads, allowing you to run better campaigns by targeting the right users and retargeting clients more effectively within the Google Ads network.
Firstly, you need to obtain your AdWords account ID:
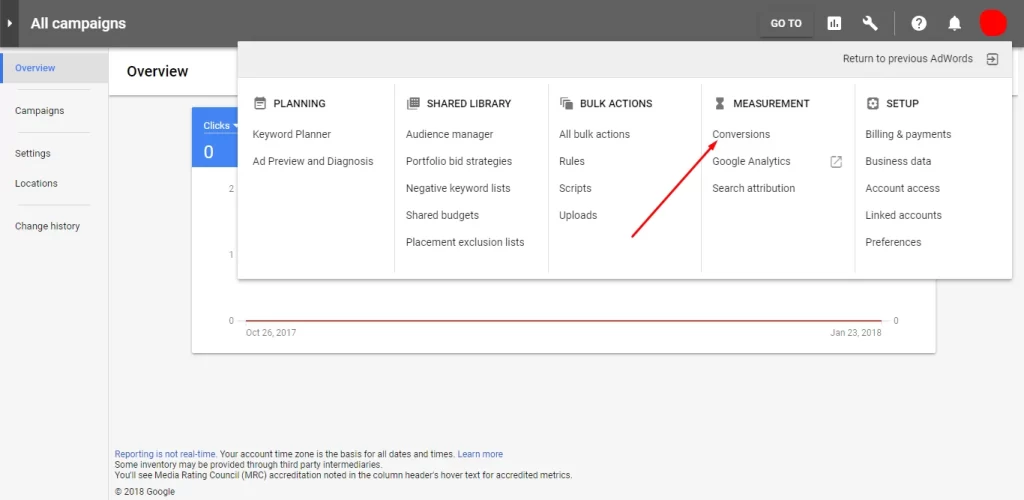
- Log in to your Google Ads account.
- Click on the Tools icon
![]()
- From the menu that appears, select Conversions.
- Click on the (+) button.
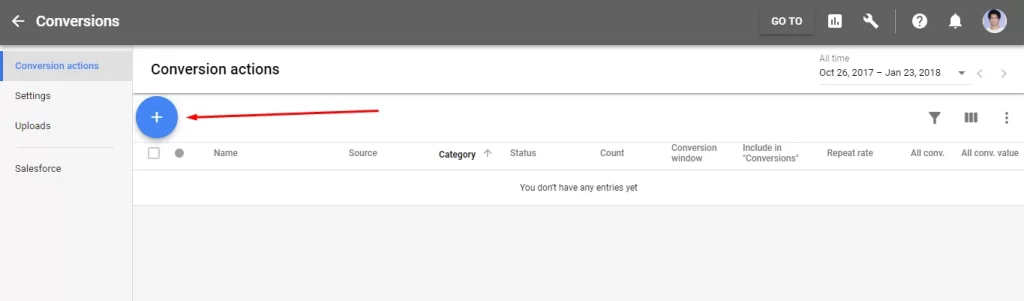
- Choose the type of conversions you want to track (e.g., website, apps, phone calls from ads) and select Import.
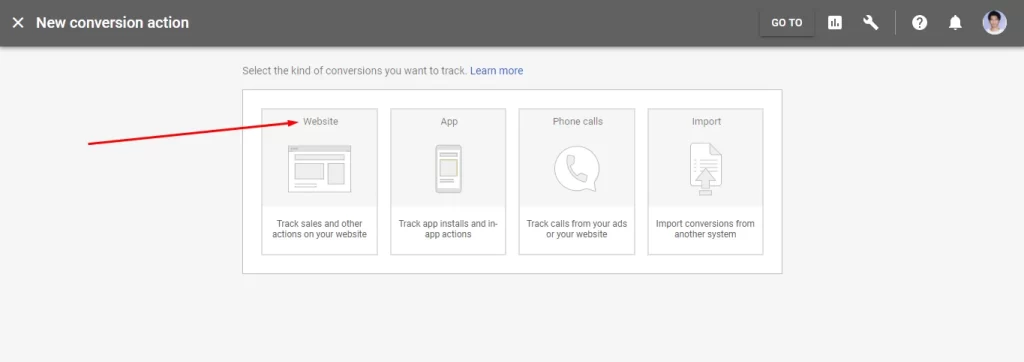
- For tracking sales and other actions on your website, click on Website.
- You’ll be prompted to create an action. Give the conversion a name, choose an appropriate category, select the Purchase/Sale tag, and check the boxes for Value and Count options that suit your needs.
- Now, copy your account ID from the global site tag.
- Log in to the WP Admin Dashboard → WooCommerce → Conversion Tracking. Paste the account ID into the corresponding box, then toggle the button to activate Google AdWords functionality.
- Finally, hit save changes.
Google Ad Events:
Google Ads supports two events: Purchases and Complete Registrations. Let’s look at how you can configure them:
Purchase
As the name implies, tracking the purchase event will help you see information about a cart when customers place an order.
Tracking Purchase events is straightforward. Check the purchase box of the WooCommerce conversion tracking plugin.
![]()
Next, create a purchase event in AdWords to generate a purchase label.
This is how to get the Purchase Label for the Purchase event?
Step 1: Enter your Google AdWords account. You will be redirected to a new page.
Step 2: Click on the Tools icon.
Step 3: Select Conversions from the menu.
Step 4: Click on the (+) button and choose the Website option.
Step 5: Create an action, give it a name, select Purchase/Sale from the Category option.
Step 6: Click on CREATE AND CONTINUE.
Step 7: In the next page, you’ll receive the label ID for the purchase event.
Step 8: Copy the label ID for the purchase event and paste it into WooCommerce Conversion Tracking.
This is how you can track Purchase events in Google Ads with the help of WooCommerce Conversion Tracking.
Complete Registration
This event in WooCommerce Conversion Tracking helps you see all the data when customers complete any registration/sign-up process.
To track Complete Registration events, check the “Complete Registration” box in the Google Adwords section of your Wordpress dashboard.
Then, create a Complete Registration event in Google Ads to obtain a registration label. Copy the unique purchase label and paste it into WooCommerce Conversion Tracking. Finally, hit the Save Changes button, and you’re good to go!
How to get the Registration Label for the Complete Registration event?
Step 1: Enter your Google AdWords account.
Step 2: Click on the Tools icon.
Step 3: Select Conversions from the menu.
Step 4: Click on the (+) button and choose the Website option.
Step 5: Create an action, give it a name, select Sign-up from the Category option, and click on CREATE AND CONTINUE.
Step 6: In the next page, you’ll receive the label ID for the purchase event
Step 7: Copy the label ID for the Complete Registration event and paste it into WooCommerce Conversion Tracking.
This is how you can track the Complete Registration event in Google Ads with the help of WooCommerce Conversion Tracking.
Important conversion metrics to track in WooCommerce:
In this section, we’ll have a look at a few key conversion metrics to monitor while running your WooCommerce store.
1. Sales Conversion Rate
Your sales conversion rate measures the percentage of visitors who actually complete a purchase. To calculate it, take the total number of sales or completed purchases and divide it by the number of visitors in a given period.
Finally, multiply your result by 100 to derive a percentage. The industry average for conversion rates is 1 – 3%, so if you manage close to or above that, it’s a sign you’re doing well.
2. Cart Abandonment Rate
Sometimes shoppers will add items to their shopping carts but leave the site without completing a purchase. While a percentage of people will always abandon carts, you should be concerned if it reaches exorbitant numbers.
In that case, you should investigate the underlying problem in your sales funnel or customer journey. To calculate the cart abandonment rate, use the following formula:
Cart Abandonment Rate = (1 – (Number of Completed Purchases / Number of Initiated Carts)) * 100
3. Click Through Rate
When you launch campaigns, you want customers to interact with your messaging (e.g., emails, ads, etc.). Tracking your click-through rate will help you discover how impactful your messaging is, which messages work fine or need improvement, and more. The formula for this metric goes like this: (Number of clicks / Number of Views or Impressions) x 100.
4. Web Traffic and Sources
If you drive traffic from multiple sources to your store, tracking your click-through rate is a must. By understanding where you’re getting traffic from and which ones are converting, you can differentiate between your hot and passive channels and budget resources accordingly.
5. Customer Acquisition Costs
This simply refers to the average cost your company incurs to acquire a new customer, including expenses like advertising and marketing. Your CAC is an important metric to track because it helps you accurately check what it costs you to acquire new customers.
The formula for calculating CAC is money spent on customer acquisition divided by the number of new customers
Tips to improve your WooCommerce conversions:
Optimize website pages:
As the basics, you will need to ensure your website is user-friendly, visually appealing, and easy to navigate. You also need to streamline the process of checking out to minimize friction and increase completed purchases.
Improve your site’s loading speed:
Sadly, regardless of how UX-friendly and aesthetically pleasing your site is if it loads at slow speeds, users will surely bounce away.
Some ways you can prevent this are by choosing a lightweight WooCommerce theme, uninstalling deactivated themes, regularly updating your plugins, and choosing a fast WooCommerce hosting service.
Create exit-intent pop-ups:
As you go about trying to boost conversions, leave no stone unturned. With exit-intent popups, when a shopper wants to bounce or leave your site, you can grab their attention and compel them to take action with an exciting offer. Here’s a resource on how to use exit-intent popups.
Perform A/B testing:
In many aspects, aggressive A/B testing will help you find the right fit for customers and boost your conversion rates.
You can test and experiment with different elements of your store, including web copy, page design, and pricing strategies, among others. Ultimately, by continuously testing, you can compare variations and determine which ones yield the highest conversions.
Final Thoughts
Tracking conversions in WooCommerce is crucial if you really want to grow your store. After all, it’s only when you know what works and what doesn’t that you can better serve your customers.
Hopefully, the instructions in this guide have shown you how to set up the WooCommerce tracking plugin, important conversion metrics to follow, and a few tips for landing more conversions.